GE Druck (a division of GE Sensing) is utilising Vision Engineering’s range of optical measurement and inspection systems to maximise the quality standards in their sensing equipment.
GE Druck is the UK Division of GE Infrastructure Sensing, based in Leicestershire. One of the main product areas at this site is the production of a variety of sensors which are used in a diverse range of industries including healthcare, oil and gas, telecommunications and transportation.
Precision pressure sensors
The Druck product name has long been associated with precision pressure sensors and related test/calibration instruments.
Their product range includes relatively low cost OEM devices to very high accuracy resonant silicon barometric sensors measuring pressures from less than 0.015psi to 15,000psi. In addition, the Druck product range includes Air Data Test Sets used to calibrate aircraft pitot static instruments from helicopters to supersonic fighters.
From air data to aircraft fuel systems and flight control to engine monitoring, GE Infrastructure Sensing plays a vital role in a multitude of demanding ground/flight test and in-flight pressure measurement applications for the global aerospace industry.
Products include pressure sensors and test equipment, used extensively by manufacturers and airlines for fixed and rotary wing aircraft throughout the civil and military sectors. Industry approvals include CAA/FAA and compliance with the latest RVSM standards.
The instrumentation, as well as a range of sensors are manufactured at the GE Druck’s Leicestershire site and are produced in accordance with numerous management systems, giving each stage of the production a bench mark for excellence. Part of the quality procedures require GE Druck to meet with extremely high standards in all aspects of their production.
Electron beam welding for accuracy down to the last micron
GE Druck utilise Vision Engineering’s systems in a number of areas where their instrumentation is assembled, which includes the assembly of the outer casing of pressure sensor bodies used for aerospace.
Sensors used for aerospace are extremely sensitive and need to be accurate to nearest micron which is why an electron beam welding process is used to weld the outer casing because it minimises distortion and shrinkage.
Electron beam welding is a process joining two components by merging them with a stream of high velocity electrons accelerating at more than 100,000 miles per second. This method of welding produces power intensities 5,000 times greater than conventional welding because the beam is concentrated to a precise area of 0.2mm in diameter.
Repeatability is high with this welding technique with maximum control governed by a filament current that controls the rate of electron emissions, and accelerating voltage which regulates the kinetic energy of the electrons. The compound used to weld the two components is usually a re-melt of the component material itself.
This welding technique provides the engineer with the capabilities of welding otherwise inaccessible locations, although easier locations minimise the process time and therefore increase productivity.
Benefits of the electron beam welding process include: precise control over penetration and dimensions; high level of repeatability; freedom from impurities; negligible distortion and shrinkage.
Although this welding process may initially seem an advanced and unnecessarily costly alternative to conventional welding, the numerous benefits and the saving on additional operations for example, stress relieving, reduces the overall cost of producing the product.
Inspection of welds using a Lynx EVO Stereo Zoom microscope
The welding process is used to weld the sensing plate and at this stage it is crucial that the weld meets with the specification otherwise any discrepancies could be costly.
After the sensor plate has been welded, but before the sensor is built up to its fully functioning capacity, the welds on the sensor plate are inspected using a Lynx stereo zoom microscope from Vision Engineering.
The penetration of the weld can be as shallow as 5µm which is why a high magnification view is important. The welds on the sensor plate are inspected for cracks, spits, misalignment and undercutting.
It is important for GE Druck to obtain guidance on imperfections for example, what welds are unusable and what welds are re-workable.
They have successfully achieved this by implementing a British Standard BS EN 13919-1 guidance on quantity levels for imperfections in electron beam welding joints in stainless steel.
If there are any imperfections found during the inspection process, the welds on the sensor body are measured for categorisation in accordance with the standard they have employed.
BS EN 13919-1 provide guidance to GE Druck to enable them to make objective decisions about any slight inaccuracies that may have occurred during the electron beam weld process. For example, they may find that the penetration of a weld has increased by 5µm and would therefore like to check if there would be any repercussions.
This is especially important for components that would inevitably form part of instrumentation (such as sensors) for the aerospace industry. There is no room for marginal error on these highly accurate and intelligent sensors.
Dimension of welds measured to tight tolerances using Hawk optical measuring system
As the penetration and dimensions of the welds can vary (depending on the sensor type), GE Druck considered several measurement options that would meet with their requirements including tight tolerance measurement in X, Y and Z.
Due to the sensitivity and tight tolerances of the sensors that are manufactured, an accurate non-contact measuring solution was adopted in the form of a Hawk non-contact system from Vision Engineering.
Optimax Imaging and Measurement Limited are specialists in measurement and provided GE Druck with the Vision Engineering measurement solution they required.
Peter Clements, Managing Director of Optimax suggested the Hawk system would be the most appropriate solution to meet the needs of Stephen Broadbridge, Departmental Manager at GE Druck. Stephen Broadbridge investigated several methods for accurately measuring the weld dimensions before deciding to invest in optical non-contact method of measuring.
The Hawk system offers accurate measurement, repeatability and reproducibility in three dimensions. If the welds require measurement for categorisation, the sensor body is simply placed on the high accuracy 150mm x 150mm measuring stage and then using the magnification options, the welds are measured in X, Y and Z.
Once the Microprocessor has recorded the measurements, they are input into an analysis table which provides a level of acceptance and consequence of the dimensions in accordance with BS EN 13919-1.
Hawk measuring microscope allowing engineers to be precise in measuring all axes
Stephen Broadbridge, Departmental Manager explains the importance of implementing a standard and a process for electron beam welding.
“A typical sensor body manufactured by our department is used for aerospace and the consequences of a sensor that does not meet with the tight tolerances required by us and our customers, could result in a waste of both material and our engineers’ time.”
“To maximise the quality and the precision of our welds, we firstly inspect the sensor plate to makes sure there are not discrepancies in both finish and dimension and then if we feel that any aspect of the weld is questionable we measure the weld in X, Y and Z”.
Stephen then goes on to explain the importance of using a non-contact system “A priority for us when looking for solutions was to choose a non-contact measuring system because of the sensitive nature and tight tolerances of our sensor bodies.”
“We have found that using the Hawk provides us with an optical image which allows us to easily find the edges of the welds enabling our engineers to be precise in their measurements in all axes.”
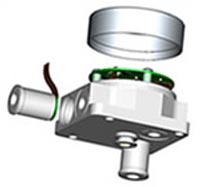
Fig.1.0. Shows a typical sensor that is manufactured to high precision at the GE Druck site at Leicestershire.
GE Druck is increasingly providing a diverse range of solutions for instrumentation for all industries. With new technology striving ahead to meet with the demands of quicker, smaller and more accurate instrumentation, GE Druck is expanding and diversifying rapidly to meet with such demands. In doing so they are investing in equipment that ensures the highest levels of accuracy and quality of the components that make up their comprehensive range of instrumentation.


