GE Druck (a division of GE Sensing) is utilising Vision Engineering’s range of optical measurement and inspection systems to maximise the quality standards in their aerospace sensing equipment.
GE Druck, based in Leicestershire, is a UK Division of GE Sensing. One of the main product areas at this site is the production of a variety of pressure sensors that are used in a diverse range of industries including aerospace.
Maintaining sensor product quality
Sensor products measure pressures from less than 0.015 psi to 15,000 psi range and range from relatively low cost OEM devices to very high accuracy resonant silicon barometric sensors.
Instruments include pressure indicators, portable calibrators, and Air Data Test Sets used to calibrate aircraft pitot static instruments from all types of aircraft from helicopters to supersonic fighters.
From air data to aircraft fuel systems and flight control to engine monitoring, GE Sensing plays a vital role in a multitude of demanding ground/flight test and in-flight pressure measurement applications for the global aerospace industry.
Demanding customers require high quality products and to that end instruments and sensors are produced in accordance with stringent quality systems at each stage of the production process.
In addition GE Druck strives to improve product quality still further and 6 Sigma methodologies are incorporated into continuous improvement activities throughout the production process.
Electron Beam Welding
Electron Beam Welding (EBW) is a fusion joining process that produces a weld by focusing a beam of high-energy electrons to heat the weld joint. Electrons are elementary atomic particles characterised by a negative charge and an extremely small mass.
Raising electrons to a high-energy state by accelerating them to roughly 30 to 70 percent of the speed of light provides the energy to melt metals. By controlling the energy level (Accelerating Voltage), number of electrons/sec (Beam Current), Beam Spot size (Focus) and weld speed an extremely repeatable weld can be performed.
A narrow weld profile is the result, which provides low distortion and very low heat input thus preventing damage to sensitive components contained inside the sensor.
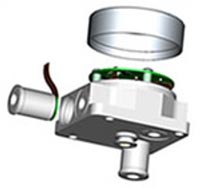
Pressure sensors incorporate a number of EB Welds in their construction (up to 15 on a complex multi-sensor Aerospace product). Any defect can cause a unit to be scrapped and any non-conforming product needs to be identified and removed from the production process so as not to incur additional work and expense.
Fig.1.0. Shows a typical sensor
that is manufactured to high
precision at the GE Druck
site at Leicestershire.
A programme of work was undertaken to improve yield through the EBW process. One issue was that acceptability of a weld profile was largely subjective against a visual standard and occasionally product could be deemed acceptable in production only to be rejected at final inspection where the cost of scrap is at its highest level.
Acceptable defect guidelines
British Standard BS EN 13919-1 provides guidelines categorising defect types, these were designated as Spits, Undercuts, Excess Weld Material, Misalignment and Sinks.
The standard also provides guidance for allowable sizes of acceptable defect but since the allowable defect size is related to weld depth (which could be less than 0.5 mm) an accurate, repeatable method of determining the small dimensions in X, Y and Z was required. For example the maximum allowance for a sink below parent material in a weld profile for a critical pressure containment weld could be as small as 0.05mm.
Steve Broadbridge, Product Improvement Manager at GE Druck, investigated several methods for accurately measuring the dimensions of weld imperfections before deciding to invest in optical non-contact method of measuring.
Requirements of a measuring system
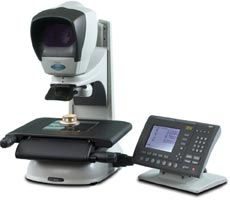
To meet the demanding requirements of a measuring system, an accurate solution was adopted in the form of a Hawk non-contact measuring system from Vision Engineering.
The Hawk system offers accurate measurement, repeatability and reproducibility in three dimensions. If the welds require measurement for categorisation, the sensor body is simply placed on the high accuracy 150mm x 150mm measuring stage and then using the magnification options, the welds are measured in X, Y and Z.
Once the microprocessor has recorded the measurements, they are compared to inspection standards in accordance with BS EN 13919-1.
Steve Broadbridge explains the importance of implementing a standard and a process for electron beam welding:
“A typical sensor body manufactured by our company may be used in an aerospace application and the consequences of a sensor that does not meet with the tight tolerances required by us and our customers could result in a waste of both material and labour.”
“To maximise the quality and the precision of our welds, we measure the imperfection in X, Y and Z. Today there is no argument about acceptability of an individual weld. We have moved on from subjective interpretation to qualitative evidence.”
Steve then goes on to explain the importance of using a non-contact system:
“A priority for us when looking for solutions was to choose a non-contact measuring system because of difficulties of access for a contact system and the small size of defect we were trying to measure.
We have found that using the Hawk provides us with an optical image which allows us to easily find the edges of any imperfection enabling our operators and engineers to be precise in their measurements in all axes.”
GE Druck is increasingly providing a diverse range of solutions for instrumentation for all industries. With new technology striving ahead to meet with the demands of quicker, smaller and more accurate instrumentation, GE Druck is expanding and diversifying rapidly to meet with such demands.
In doing so they are investing in equipment that ensures the highest levels of accuracy and quality of the components that make up their comprehensive range of instrumentation.


