Vision Engineering has developed Hawk®, a unique non-contact measurement system that is the first to offer both a true optical image display combined with fully automatic video edge detection. Both of these technologies have been available individually but never before as a combined package.
Two in one (optical and video measurement)
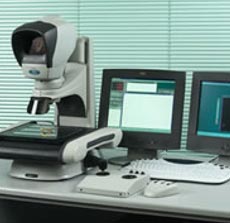 Hawk can be run either manually, motorised or in fully automatic mode. For rapid product changeover, manual operation allows for very quick setup in any measurement task. For high volume throughput, automation allows repeated, objective inspection much faster than manual measurement.
In between these extremes, there are a whole host of application areas that benefit from partial automation – where components can not be automatically checked or where product variety makes multiple measurement routines impractical.
Hawk allows both techniques to be used in one system, and this opens up many opportunities where previously either technology alone would be insufficient. One significant application area for the new Hawk technology is moulded automotive component inspection.
Manufacturing criteria
Automotive components have critical quality requirements in terms of function, tolerance and aesthetic appearance. Increasingly, plastic components are being used in automotive manufacture where previously steel or aluminium would have been necessary. This isn’t simply limited to interior trim but includes mechanical components as well.
While reducing overall weight and improving the cosmetic finish available, this trend does demand that the manufacturing criteria on such plastic components now equates to that previously associated with machined metal.
Unique benefits of the Hawk
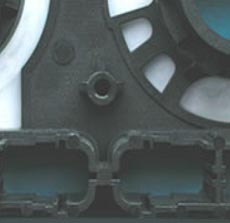
To measure a black low contrast object on a black low contrast background presents significant challenges to most non-contact measurement systems. This is where the unique benefits of the Hawk system come in to play.
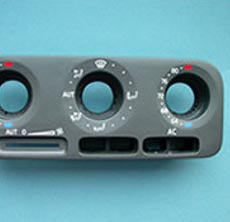
As an example, a Peugeot climate control fascia panel is moulded in very dark grey. This panel must fit exactly into the climate control assembly or the unit may rattle and the driver would see a bad fit.
This panel is sub-contract manufactured in high volume and requires several key measurements to be accurately verified. An operator using an optical system may not be cost effective because many of them are highly repetitive.
An automated video based system would face difficulties because the contrast between black on black edges is too low. The solution is the combined approach as used by Hawk.
The basic, clearly defined edges can be automatically measured using Video Edge Detection (VED) technology. This allows for the majority of the checks to be fully automated, relieving an operator from time consuming, repetitive tasks.
Once these are completed, the patented optical display head can be used, allowing the operator to use subjective experience and the ability to manually define a feature to measure the difficult, low contrast features. The result is a system that offers the best of both worlds
Designed by engineers, for engineers
Patented Dynascope technology presents a clear, pure optical image to the operator through the expanded exit pupil display head. This image has not been digitised and will not suffer from loss of colour rendition or contrast problems.
Video based systems always suffer when viewing low contrast black on black, white on white or transparent features, as typified by many automotive mouldings. The human brain is by far the most powerful image processing system available and for difficult optical subjects, the best results will come from a pure optical image being presented to a human operator.
Using a fully automated Hawk system, the majority of measurements can be controlled by the PC software with just complex parts being presented to the operator, who can input edge locations.
Over specification has become a problem in the production environment. Usability is equally important as capability on today’s shop floor, as a powerful and all capable system will only earn its keep if it can be used, day to day by production staff. It is this thinking that has driven the development of the Hawk family to be “designed by engineers, for engineers”.
Reduced inspection cycle time and improved repeatability.
Hawk is intended to be used on or close to the shop floor, directly, by the multi-skilled, non-specialist engineers who run the manufacturing process. Because components can be taken directly from the moulding or machining station to the Hawk, feedback is rapid and directly to where the information is needed. If the component is distorted or out of tolerance, remedial action can be taken immediately.
Hawk can be set up to run manually or fully automatically. With the Peugeot climate control panel moulding, this means that initial pre-production runs can be closely monitored and measured using a completely manual inspection setup.
The flexibility of manual operation means that changes can be quickly accommodated without the need for skilled programming knowledge. Once volume production is begun, many of these checks or measurements can be fully automated, resulting in higher throughput, reduced inspection cycle time and improved repeatability.
As automotive mouldings become more complex and quality critical, consumers grow more demanding and have higher expectations. This all drives the need for non-contact measurement systems that are accurate, user friendly and capable of measuring optically difficult components in volume. The Hawk has landed.
